

Saturday, January 16, 2010


Friday, January 15, 2010


Thursday, January 14, 2010
Stamp's edge Photo
To put photos into a new page, we need to make it look more vivid by adding individual photo with stamp's edge.
1. Open a new page with white background and set the size to 12in x 8.5in, and set the resolution to 180 pixels per inch.
2. open a photo that you want to put into the new page and set the resolution to 180 pixels per inch too.
3. Press control-A on the photo to select it then press contol-shift-J to create a new transparent layer above the background layer.
4. Click on the transparent layer then increase the canvas size by 1 in x1 in.
5. Use rectangular marquee tool to draw a rectangle with 0.5 in bigger than the photo. Fill it with color white, click (Drop Shadow) and set the angle to 45 and size to 10.
6. Click (Window)(Brush) to select the size of eraser tip and check the spacing to turn it on, set the spacing to 175%.
7. Click the path tool to turn it on then click (window)(Path) to open the path window. click (make work path) then click "OK"
8. From the (Path window) click (Stroke path) and select Eraser from the new window then click "OK"
9. Merge the layers from top down to the layer above the background layer.
10. Click the (move) tool to turn it on then click drag and drop the photo to the new page.
11. Click the photo layer then click (Edit)(Free transform) to do some rotation and some adjustment of the size.
12. Repeat the process from step 1 to step 11 if you want to add another new photo to the new page.

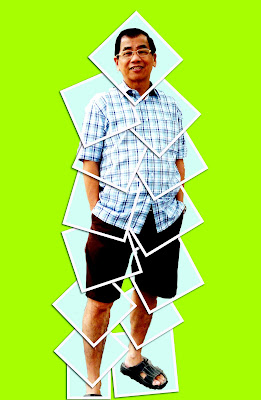
Divide Photo
It is very interesting to make a photo looks funny by dividing it into many frames.
1. Use a rectangular marquee tool to draw a square around the head of the picture then right
1. Use a rectangular marquee tool to draw a square around the head of the picture then right
click inside the square,select (Transform Section), then rotate the square to an angle.
2. Right click inside the square again, this time choose (Layer via copy), to create a new layer.
3. Click the new layer then click (Layer Style)(stroke), select position=inside,color = white
2. Right click inside the square again, this time choose (Layer via copy), to create a new layer.
3. Click the new layer then click (Layer Style)(stroke), select position=inside,color = white
size =15, then click "OK".
4. Click (layer Style)(Drop shadow), set the angle = 45, distance =5 spread =10, size =5,
4. Click (layer Style)(Drop shadow), set the angle = 45, distance =5 spread =10, size =5,
then click "OK".
5. Repeat step 1 to step 4 until the whole photo is covered by the frames.
6. Merge the layers from top down to the layer just above the background layer.
7. Color the background layer.
8. flatten the image.
5. Repeat step 1 to step 4 until the whole photo is covered by the frames.
6. Merge the layers from top down to the layer just above the background layer.
7. Color the background layer.
8. flatten the image.
Wednesday, January 13, 2010
Type Effect - Perspective 3D Text
Perspective 3D Text:
1. Use Arial Black and color yellow to type a text, e.g. "HOO'S GARDEN".
2. Control-click the text layer then click (layer)(Rasterize Type).
3. Click (Edit)(Transform)(perspective), then click the right hand lower corner of the rectangle
and drag it to the to the right until it form a perspective view.
4. Duplicates the text layer by control-click drag and drop the text layer to the button at the
bottom of the layer window called "Create a new layer", color the duplicated text with red or
any color as you like best.
5. Control-click the text layer then click the "Move Tool" to turn it on, press (Alt and down
arrow) key for few seconds until the thickness of the text if formed.

1. Use Arial Black and color yellow to type a text, e.g. "HOO'S GARDEN".
2. Control-click the text layer then click (layer)(Rasterize Type).
3. Click (Edit)(Transform)(perspective), then click the right hand lower corner of the rectangle
and drag it to the to the right until it form a perspective view.
4. Duplicates the text layer by control-click drag and drop the text layer to the button at the
bottom of the layer window called "Create a new layer", color the duplicated text with red or
any color as you like best.
5. Control-click the text layer then click the "Move Tool" to turn it on, press (Alt and down
arrow) key for few seconds until the thickness of the text if formed.

Type Effect - Photoshop 7
C. Simulated 3D golden forte font text:
1. Use font Forte and color yellow to type a text, e.g. "HOO'S GARDEN", control-click the the
"Text layer" to select the text.
2. Click (Edit)(copy) and then (paste) to duplicate the text, name the layer as "layer 1",
color the text with orange.
3. Adjust the duplicated text slightly up and to the right a bit, make it look like 3D.
4. Click (Layer Style)(Bevel and Emboss)(bevel hard), and set the size to 10.
5. Check the the contour checkbox to turn it on and adjust the contour curve to make it look
like a sin curve. click the Color Overlay checkbox to turn it on too, change the text color to
orange.
6. Click the "Text layer" and repeat the step 5 process but keep the text color as yellow.
7. finally set the background color to black.

1. Use font Forte and color yellow to type a text, e.g. "HOO'S GARDEN", control-click the the
"Text layer" to select the text.
2. Click (Edit)(copy) and then (paste) to duplicate the text, name the layer as "layer 1",
color the text with orange.
3. Adjust the duplicated text slightly up and to the right a bit, make it look like 3D.
4. Click (Layer Style)(Bevel and Emboss)(bevel hard), and set the size to 10.
5. Check the the contour checkbox to turn it on and adjust the contour curve to make it look
like a sin curve. click the Color Overlay checkbox to turn it on too, change the text color to
orange.
6. Click the "Text layer" and repeat the step 5 process but keep the text color as yellow.
7. finally set the background color to black.

Type Effect - Photoshop 7
B. Golden Batavia Text:
1. Use font Batavia and color light grey to type a text, e.g. "HOO'S GARDEN".
2. Name the layer as Text layer".
3. At the bottom of the layer window click the button calls "Layer Style" and choose

1. Use font Batavia and color light grey to type a text, e.g. "HOO'S GARDEN".
2. Name the layer as Text layer".
3. At the bottom of the layer window click the button calls "Layer Style" and choose
emboss>, select and set the size to 10.
4. Change the contour curve to make it look like a "sin curve".
5. Click the contour checkbox to turn it on.
6. Clcik the Color Overlay checkbox to turn it on too.
7. Finally change the text color to orange and the background color to black.

Type Effect -Photoshop 7
A: Picture text:
Use Photoshop to design a text is quite interesting. Let us look at the text which is being cover by a picture.
1. Type a text with any font, e.g. "HOO'S GARDEN".
2. Open a colorful picture.
3. Use the "Move" tool to move the picture over the text.
4. Press control-G key on the picture layer.
5. Click, set the size to 20, press "OK".

Use Photoshop to design a text is quite interesting. Let us look at the text which is being cover by a picture.
1. Type a text with any font, e.g. "HOO'S GARDEN".
2. Open a colorful picture.
3. Use the "Move" tool to move the picture over the text.
4. Press control-G key on the picture layer.
5. Click

.
Monday, January 11, 2010
Use Photoshop to fix red eye
Sometimes you may find that some photos you have taken have red eye. It s due to the reflection of light. There are several methods of fixing the red eye. I like to use "Layer with Apply Image" method. because it is easy to apply.
1. open the photo with red eye, control-click the photo then control-shift click again to add a white new layer.
2. Duplicating the photo layer then use circle selecting tool to select the red eyes.
3. Click(Image)(Apply Image), from the window display select channel and choose one colour(either red, green or blue, it depend on the black and darkness you think is more suitable.) then click "OK".
4. Click (Select)(Inverse) to inverse the selection, then click delete button to delete the surrounding parts.
5. Flatten the layers, the photo's eyes are fixed.
1. open the photo with red eye, control-click the photo then control-shift click again to add a white new layer.
2. Duplicating the photo layer then use circle selecting tool to select the red eyes.
3. Click(Image)(Apply Image), from the window display select channel and choose one colour(either red, green or blue, it depend on the black and darkness you think is more suitable.) then click "OK".
4. Click (Select)(Inverse) to inverse the selection, then click delete button to delete the surrounding parts.
5. Flatten the layers, the photo's eyes are fixed.

Sunday, January 10, 2010
Editing Photo
Selecting an image from a given photo needs some methods and skills. I have discovered a simple and easy way to select an image from a photo by using layers.
Step 1 open a jpeg image then duplicating a layer, control click this duplicated layer.
Step 2 Click on (Image)(Adjustments)(Level) set the input to 30.
Step 3 Click on ,(image)(Adjustments)(Brightness/Contrast), set the contrast to +20.
Step 4 Use Polygonal Lasso Tool to trace the outline of the image.
Step 5 Click on the background layer and choose (Select)(Inverse) to inverse the selection.
Step 6 press the delete key to delete the unwanted parts.
Step 7 Open a new photo which I want to put the selected image on to it.
Step 9 Press control-A keys to select the photo and press control-shift keys to create a new white background layer. Click the white background layer and create a new transparent layer above the background layer.
Step 10 Move the selected image to the newly open photo, use free transform to scale down the size of the image.
Step 11 Use layer mask to do some adjustments of the image then flatten the layers. The new photo is created.
Step 1 open a jpeg image then duplicating a layer, control click this duplicated layer.
Step 2 Click on (Image)(Adjustments)(Level) set the input to 30.
Step 3 Click on ,(image)(Adjustments)(Brightness/Contrast), set the contrast to +20.
Step 4 Use Polygonal Lasso Tool to trace the outline of the image.
Step 5 Click on the background layer and choose (Select)(Inverse) to inverse the selection.
Step 6 press the delete key to delete the unwanted parts.
Step 7 Open a new photo which I want to put the selected image on to it.
Step 9 Press control-A keys to select the photo and press control-shift keys to create a new white background layer. Click the white background layer and create a new transparent layer above the background layer.
Step 10 Move the selected image to the newly open photo, use free transform to scale down the size of the image.
Step 11 Use layer mask to do some adjustments of the image then flatten the layers. The new photo is created.


Wednesday, January 6, 2010
Monday, January 4, 2010


Friday, January 1, 2010


Subscribe to:
Posts (Atom)